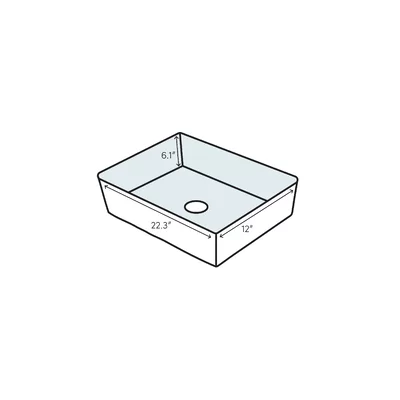
Miky Ceramic Rectangular Undermount Bathroom Sink with Overflow
About our links
Some links on this site are affiliate links. If you buy something through them, we may earn a small commission from the shop, at no extra cost to you. Prices and stock come from the shops and can change.
The price comes from the shop and can change. Check price, size and delivery on the shop's page before you order.
Features:
Installation Type: Undermount
Corner Sink Installation Type:
Dual Mount Installation Types:
Sink Shape: Rectangular
Specialty Shape:
Finish: White
Primary Material: Ceramic
Natural Variation Type: No Natural Variation
What is an Overflow?: An overflow is a small hole in the back of the sink that prevents the sink from overflowing. When the sink is full of water, this hole allows air to circulate to the drain so the water can drain more quickly.
Overflow Hole: Yes
Faucet Included: No
Flow Rate (GPM):
Handles Included: No
Craftsmanship Type: No Craftsmanship
What is a Shut-Off Valve?: A shut-off valve is connected to the water lines and allows you to turn off the water for just one plumbing fixture instead of your entire home.
Shut-Off Valve Included: No
What is a P-Trap?: A p-trap holds water to prevent sewer gases from entering the home through the drain. It also traps debris that has drained from the sink to prevent the plumbing system from being clogged.
P-Trap Included: No
What are Supply Lines?: Supply lines bring water and gas from the plumbing pipes behind your walls to your fixtures.
Supply Lines Included:
Pedestal Included:
Compatible Pedestal Part Number:
Console Included:
Shroud Included:
Country of Origin: Italy
Style: Modern & Contemporary
Compatible P-Trap Part Number:
Compatible Shut-Off Valve Part Number:
Compatible Drain Assembly Part Number:
Compatible Supply Lines Part Number:
Compatible Mirror Part Number:
How to Install (String): To begin, take the entire countertop off of the vanity and turn it upside down onto a towel on the floor (this prevents countertop scratching). Next, rest the sink over the cutout on the counter and make sure the sink is centered with the drain hole and evenly spaced between bolt holes. Then, with a pencil, create an outline of the sink on the countertop and apply a 0.25" layer of silicone on the rim of the sink. Carefully place the sink upside down on the countertop and position it within the outline you drew. Lastly, attached the sink clips snugly and then carefully lift and place the counter and sink onto your vanity. Connect your faucet, drain, p-trap and supply lines.
Spefications:
ASME A112.18.2 Compliant:
ASME A112.19.1/CSA B45.2 - 2018 Compliant:
ADA Compliant:
UL Listed:
ASME A112.19.2/CSA B45.1 Compliant:
California Proposition 65 Warning Required:
ASME A112.19.3 Compliant:
ISTA 3A or 6A Certified:
ISTA 1A Certified:
ASSE 1001 Certified:
ASSE 1016 Certified:
TÜV Rheinland Certified:
NSF/ANSI 61 Certified:
cUL Listed:
ISO 14000 Certified:
ISO 9000 Certified:
CSA Certified:
UL 1951 Listed:
CSA B125.1 Certified:
UPC Certified:
NAHB Compliant:
Vermont Act 193 Compliant:
IAPMO Certified:
NSF Certified:
ASME A112.18.1 Compliant:
Low Lead Compliant:
Energy Star Compliant:
Environmentally-Preferable or Lower Environmental Impact Certifications: